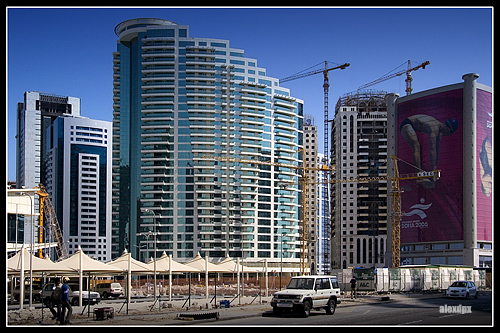
 Beverly Hills Tower in West Bay, Doha, Qatar.
Most people's idea of architectural photography is to take a picture of a building and try to include everything in the frame. That is, of course, a valid assumption especially if you are shooting for an arhitectural firm who will be using the photo for it's portfolio of completed projects. Realtors may also require such a photo for marketing purposes.
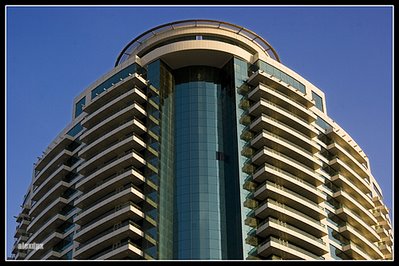
Detail of Beverly Hills Tower's upper floors and roof top.
However, myself an architect, I feel that photographing a building that way is more of recording another artist's work. Nothing wrong with that if that is the main purpose of the photoshoot or if that building is my work. But if your purpose is creative architectural photography, I suggest that you think "outside of the box."
 Recently, I've been commissioned by our office to photograph three buildings. They are our three most recently completed projects. The photoshoot is multi-purpose, meaning the resulting pictures will be used in a variety of way but the more immediate purpose is to have a feature in our 2007 calendar. That was all the briefing I got. When I asked what kind of pictures are they looking for, our marketing department replied, "You're an architect and a photographer at the same time; I think you know better what kind of pictures we should have. Our only requirement is some daytime shots and some night shots." That delighted me. Not only do I no longer need to explain my ideas; that would simply mean that I have creative control and freedom to put my knowledge to the test. So I decided to take on each building on separate days and nights. I will let you know why later on.
So now, based on academic knowledge and practical experience, let me share a few tips on photographing architecture succesfully.
PLANNING STAGE
 Movenpick Hotel (left) as viewed from 7 km away.
1. PLAN AHEAD. A succesful shoot requires careful planning. Before even going to the site, have a look at the vicinity map and familiarise yourself of the orientations. Find out where the sun rises and sets - this will help you determine whether to schedule your shoot in the morning or in the afternoon. It's never good to shoot at noon time and it's even worse to photograph architecture when the sun light is behind the building. Studying the vicinity map also lets you study where would be a good location to take your shots.
2. PRE-VISIT. Before bringing your camera to the site, do a visual survey of the site. Visually confirm if your selected viewpoint (from your study of the vicinity map) is really a good choice. If not, walk around the site and see how forms, shapes, and light effects change. View the building straight up from its base, then step back and view from close distance, then from quite a distance, from different points in the vicinity. Observe how lighting changes from different times of the day and what effects they cast on your subject.
3. GET A PERMIT. Afterwards (or perhaps prior to visual survey) approach the building owners / managers / security personnel and let them know of your purpose so that you may secure a permit (written or verbal) if they require one. A permit will set you free from harrassment by security or police personnel and sets you free from being suspected as a terrorist or something. How you look will play a big part on whether you get or denied a permit. It would be a good idea to look professional and dress smartly. Have your identifications ready and if you have a business card, give one immediately as you introduce yourself. Implying that you have no fear of being identified gives the impression that your purpose is truthful and that you mean no harm. 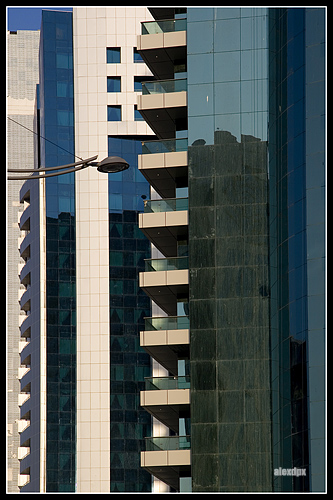
If the photoshoot is commissioned by the owner, then securing a permit should be the least of your worries.
I will not go into the details of what equipments you will need. If you have done your planning, you should be able to determine for yourself.
DURING PHOTOSHOOT PROPER . . .
LOOK PROFESSIONAL. As mentioned earlier, how you look affects how people react to you. If you dress up smartly and wearing a visible ID, most people will have the impression that you are a professional at work. Police or other security officers who are not aware of your activities will tend to approach you more politely. If they do, explain your activity just as politely.
TIPS AND TECHNIQUES
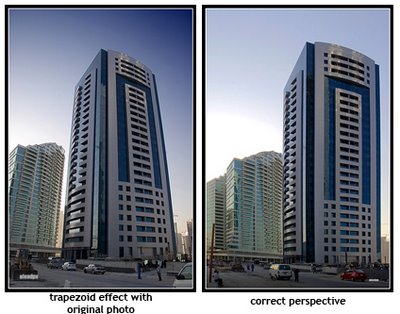
A side by side comparison showing the difference between a shot using a normal lens and a shot with the perspective corrected with Photoshop. Personally, I would rather do this with a tilt-shift lens but I don't have one and I can't afford one.
1. KEEP VERTICALS VERTICAL. The basic rule and challenge of architectural photography is keeping the vertical lines vertical. If you do not believe me, just flick through the pages of architectural books or magazines like Architectural Digest, Architectural Record, Architectural Review, World Architecture, etc. Vertical lines are kept vertical. ('Still don't believe me? Fine, I won't argue.) The problem is when you tilt the camera to fit the building from the foot to its parapet, the lines converge at the top making the building look like it's leaning backwards. This is what is known as the "trapezoid effect". (More on this lens phenomenon can be read here (http://photo.net/equipment/canon/tilt-shift).
 It is for this reason that tilt-shift lenses are made (in the Canon and Nikon lens line-up - no Sigmas, Tamrons, Tokinas, etc. I heard that Pentax used to manufacture a similar kind of lens before but they are now discontinued). Although the tilt function is used for further minimizing or maximizing depth-of-field, the shift function is for correcting perspective. These lenses are manual focus only - no AF. They are hard to find and are quite expensive.
You may follow the advise in the above mentioned link to avoid the trapezoid effect or you can do the correction using photo editing softwares. However, each have their drawbacks which I would prefer not to ellaborate here because each is a discussion in itself.
 2. BREAK THE PREVIOUS RULE. As the saying goes, rules are meant to broken. But to break a rule, first, you have to learn it so that you may have a good reason for breaking it. For example, if you are taking the shot right from the base of the building and shooting straight up . . . see what I mean? The building on the left is just 25 stories but shooting up from the base of the building itself dramaticized its height and made it look taller than it really is.
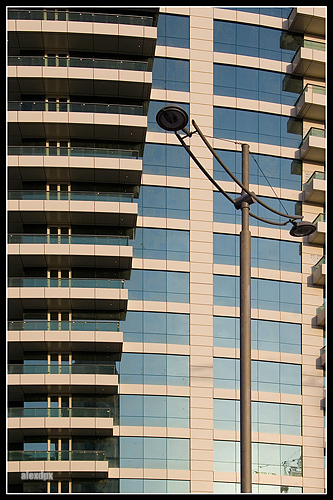
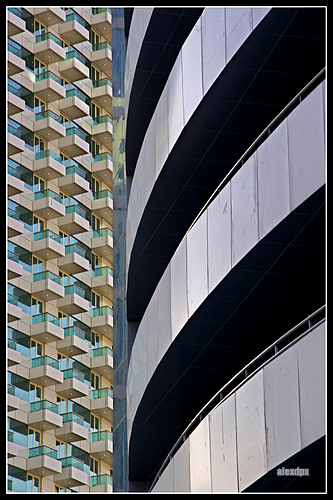
3. SHOOT FOR DETAILS, PATTERNS, RHYTHM. This is the part where you "think outside of the box." Observe the building's lines and geometry, walk around the building and see how the lines and elements create interesting rhythm and patterns. Look for interesting angles. Shoot wide and shoot with telephoto.
 4. INTERESTING FEATURES. A building's interesting features are usually it's most distinctive as well. If a building has one, take a picture of it by itself. Such features should be easily recognizable as a photo of that particular building you are shooting even if it doesn't show the whole building.
5. HYPERFOCUS. Stop down your lens. Architecture is about perspective, lines, details, shades and shadows. Everything need to be in sharp focus to show those elements. Treat an architectural shoot like a landscape shoot. Shallow depth-of-field rarely ever works in architectural shoots.
Well, there you have it. As you see, architectural photoshoot is a tedious piece of work. It's probably easier when you're shooting just one building, but when you're shooting three . . .
I'm afraid that all the planning and pre-shoot stuff are necessary to produce the best possible results. Work around those and you'll probably end up with acceptable, but not exceptional results.
I hope you find this article useful, helpful and interesting enough because this has a sequel - coming soon - "Architectural Photography: Night Shots".
Cheers,

8 comments:
That's "Work"! doing things you like to do and getting paid for =D
very informative. Thanks Alex
i have found this article very useful and helpful indeed. Thanks for sharing alex. :)
Very nice article, Sir Alex. Thanks a lot! :)
Thank you everybody! Meron pang part 2 =)
can't wait for the part 2 na nga eh hehe..
bravo! ang galing! thanks for the tips and your added insights. :)
Draft is almost ready Pat - ilalagay na lang sa dashboard :)
Thanks a lot Aby :)
Post a Comment